In addition to manually installing WordPress via cPanel, you can also install WordPress via WP Toolkit, which is a much easier way:
WP Toolkit is a tool that is integrated into cPanel and serves to manage WordPress installations. It allows users to easily install, update, secure and manage their WordPress sites directly from cPanel. It also provides the ability to administer multiple WordPress sites hosted on that hosting account.
This tool often includes functionality to automatically update WordPress, backup data, manage themes and plugins, and other useful options for easy maintenance of WordPress sites.
- Log in to cPanel
- In the Domains section, click on WP Toolkit
![]()
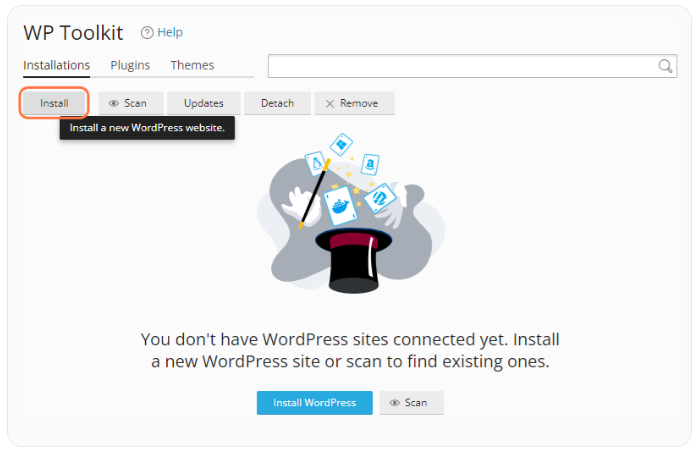
3. Click the Install WordPress button
GENERAL:
The Installation path option is the location where WordPress will be installed.
- In the first field, you choose the protocol - HTTP or HTTPS
- Select the desired domain if you have more than one on the hosting, on which WordPress will be installed
- In the third field Installation directory, you select the installation subdirectory. If you leave the field empty, WordPress will be installed in the home directory of the domain
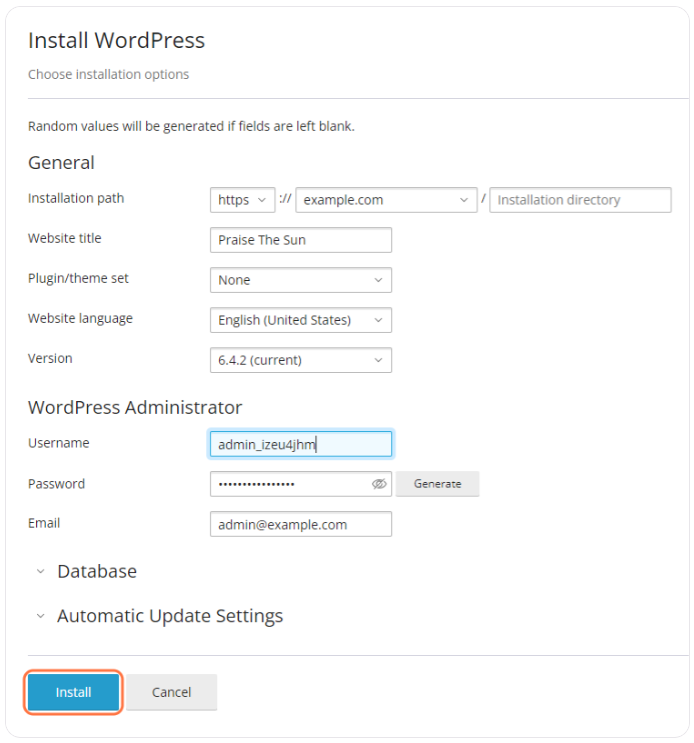
- The Website title option is the name of the site, which can be changed later
- Option Plugin/theme set - here you can choose a set of plugins and themes for WordPress that will be additionally installed. If you select None, only the most basic will be installed
- Website language option - WordPress language
- Option Version - WordPress version
WORDPRESS ADMINISTRATOR:
- Username option - choose a username to log in to the WordPress admin area
- Password option - choose a password for logging in (you can also click on Generate where the system will choose a good and strong password)
- Option Email - email account to which you want to link the username
WP Toolkit itself chooses the database name, database username, and database password for WordPress, if you don't want to change those details, click the Install button
If you want to change the name of the database, click on Database
DATABASE (optional):
- Database name option - enter the desired database name
- Database table prefix option - enter the desired database table prefix
- Database user name option - enter the desired database user name
- Database user password option - enter the desired database user password (you can also click on Generate, where the system will choose a good and strong password)
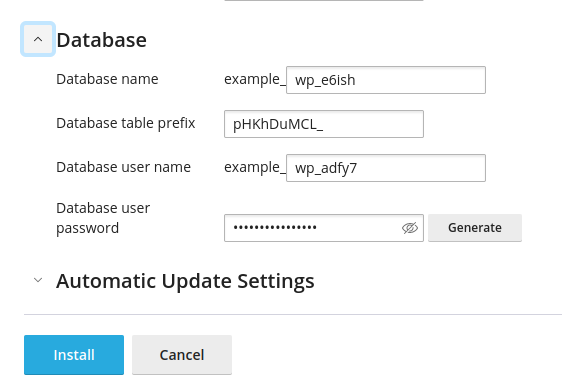
- Click the Install button
As the next step after installation, we recommend Securing your WordPress installation
